
· By Justin Vitale
Giza Dream - Valley Rule DJ Set (+Bonus Tutorial)
Crunchy and esoteric, Giza Dream drifts through the aether with spiritual hymns straight from the Nile Delta. It's a new age Middle Eastern fever dream of pyramids and the stars - combing the sands for long lost samples in the ruins of time.
Valley Rule: Volumes 1& 2 - Out Now 25 Limited Edition Cassettes https://gizadream.bandcamp.com/ + All Streaming Services
How to Film a Green Screen DJ Set:
There is a lot that goes into video production and it can easily become overwhelming when you combine it with a live performance. The proper gear and setup is essential to make sure you are able to capture your idea and transform it to a final video. Let's take a look at all the steps involved so you can get the most out of your time and not get stuck on any of the stages.
1. Preparation - Hanging Green Screen
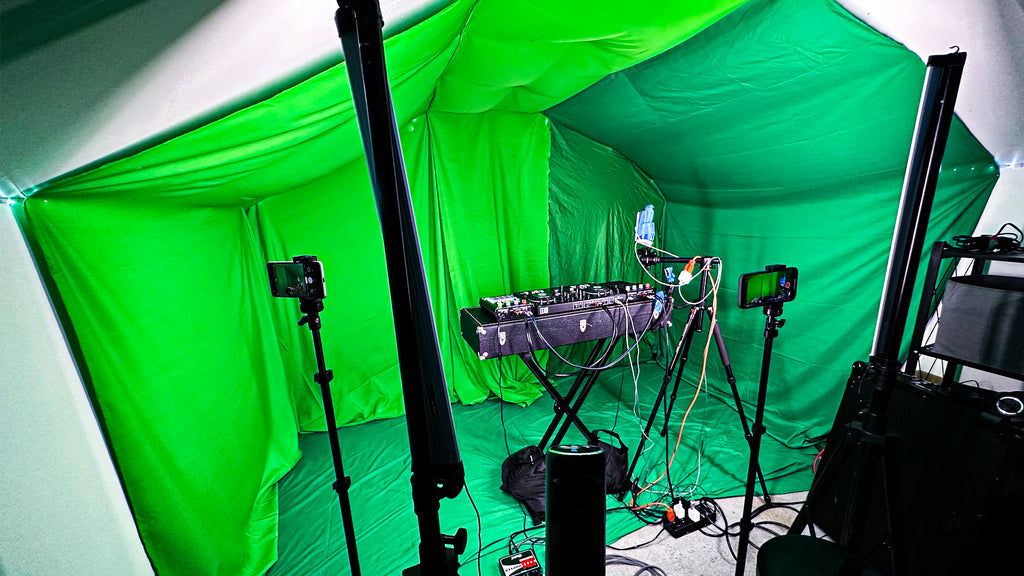
What is the space you are shooting in? You will need to hang either a single backdrop or stitch together multiple if you have an odd shaped room like mine. Working with angles and corners is rough. Any lines in the green screen will make shadows and shadows will mean that when you go to key out the green - you will have to take darker tones which might also take out some of your content. Bright lights will help tremendously if you end up with lines or shadows but they will not completely fix the issue.

In the example video above you can see that I have successfully removed all the shadows but it comes at the expense of some of the gear becoming transparent as well. This is a limitation of my space that I have come to accept until I can find a better one. Your situation might be the same so don't drive yourself crazy, especially at the first stage!
Another pointer is that all green screens may not be the same color green. When you go to buy yours, make sure you purchase all from the same vendor. I bought mine at different times and ended up with one screen that is considerably darker than the rest.
2. Preparation - Gear & Camera Angles
Once your screens are down it's time to bring in the music gear - but not all at once. Start with your table or stand and place it where you think it will work. Take out your cameras and begin to test the shots to make sure that everything will fit and your screen is covering to all edges. You can always crop in post but that is not ideal (you might end up having to crop important content). Once you are confident that your camera/s will capture everything without issue you can begin setting up and connecting your equipment.

Old phones are a great way to do multi-camera shots if you have any lying around the house or if you have friends or family with ones they are not using. If you plan on doing a single shot, usually a straight on that includes either the full body or from waist to above the head is your best bet. In the example video I used a straight on from the waist up, a side shot also from the waist up, and a close up detail shot of the equipment.
It is very important that before you start shooting that you have enough free memory on either your phone or camera. You definitely don't want to run out of free space while you are shooting. Be aware that likely you will not get it in the first take and if you are filming a lengthy DJ set, this means many multiple long videos.
Another thing to consider is how you will be powering the cameras. Is it possible to leave them plugged into wall power? In my case I am using old phones and leaving each one charging while I shoot so the battery won't die mid set. Some might have a recording limit of how long they can shoot video for continuously. If they do - you will have to plan around that. Some will continue recording but separate the files into multiple instead of one. This may or may not leave a small gap in your footage.
3. Preparation - Lights
Dedicated video lights make a world of a difference in terms of white balance and brightness. For this video example I have repurposed photo light-box lights and duct taped them to my PA speaker stands. They illuminate with a balanced white light that shows true colors of skin and objects and are extremely bright. If I didn't use these I would have a tough time taking out the green screen completely because of my odd shaped room.
If you haven't worked with bright lights before, they make a small space very hot. I would advise for you to keep a fan handy or you will be sweating in no time.
4. Preparation - Capturing Audio
The audio is essential to the final product since this is a performance based video and you should be confident that you are capturing it correctly. How many sources of audio are you recording? In the example video, there is a single stereo output that I am capturing straight to my main camera. You might have more sources, which means that you will need to need to record the audio on a separate device other than the camera to retain multi-track audio to mix in post. Let's look at both examples of single and multi-source audio.
Single source audio (either mono or stereo):
In the example video I am routing the audio from the DJ decks to a passive stereo DI box by Radial that allows me to send the audio both to my PA system for live monitoring, and splits it to send to my iRig Stream Pro which then connects to my iPhone (main camera). With this setup I can listen to myself live and record simultaneously utilizing the OUTPUT and THRU connections on the Radial box. This isn't the only option however.
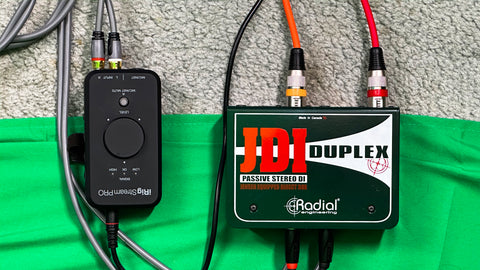
If I didn't have the DI box with a THRU connection, I could use the REC OUT on my PA head to connect to my iRig Stream Pro. I did test this method and compared it to the DI box - and the DI box won in terms of sound quality. Other methods could potentially include a secondary OUTPUT on your DJ device or even a HEADPHONE out. iRigs and other recording devices usually have an OUTPUT or HEADPHONES built in, so if you didn't have a secondary OUTPUT or DI box to split between recording and monitoring - you would be able to split on the recorder to send the audio out to your monitoring device.
Recording audio straight to the camera is very convenient in post-production. Since each electronic device has its own internal clock and sample rates, you might find by recording the audio separately that you can't line up the audio and video perfectly. This can range from barely noticeable to problematic if you have a longer recording time - being out of sync will compound over time and get worse and worse. You will also never 100% fully sync separately recorded audio to video.
Multi-Source Audio
If you are working with more than one instrument or device it is important to retain multi-track audio for editing in post. In the heat of the moment it is very easy to have poor level management and lose objectivity over a live mix. Flattening your audio down during filming will prevent you from being able to readjust levels or process the elements of your music separately. You will need a recording device that can accept the same number of inputs of whatever you are outputting. Besides recording the audio, you will need a way to hear it live as well in order to perform.
5. Preparation - Rehearsal & Test Shot
Once you have everything in place, hit the record button and rehearse a segment or full take of your set. The red blinking light has a tendency to all musicians forgetful of the material even if you've practiced a thousand times. Take this opportunity to loosen up and test your camera equipment to ensure you have the proper shots and everything is correctly in the frame.

After recording, upload the footage to your computer and attempt to key out your green screen. Are you satisfied with the result? Does the lighting look okay? How is the sound capture? Now is the time to iron out any kinks and make adjustments to your set up.
6. Show Time - Recording
You should feel like you know the ins and outs of your setup at this point and any surprises should have been resolved by now. It should be as simple as walking into your space and turning everything on - already knowing what to expect.
Still even with a lot of preparation, the blinking red light can cause mistakes you might not normally make and cause performance anxiety. The bonus here is that you have all the time in the world to get it right and it doesn't need to be on the first take.
If you are using a multi camera setup, I find it helpful to go around to the cameras in a specific order so I make sure that all of them are on and recording (going clockwise for example). Don't rush, hit the button and walk away. Look at the screen and confirm each is recording before moving to the next. Nothing worse than not capturing the perfect take!

In a similar vein, it's not a bad idea to double check that your audio is recording before you start by taking a quick test recording with all your gear and making sure levels are strong but not clipping. It's possible during practice that a setting could have been moved and not put back into an expected position.
NOW you are ready for the big moment. Breathe and have fun! Try not to stress and get in the moment. Yoga is very helpful for calming your nerves and focusing if you struggle here.
Even after you get what you feel is the most perfect take, it is often advised to shoot a little extra in case something ends up being wrong with the main footage. The idea here is that it is better to shoot while everything is set up and you are warmed up, instead of having to come back to it all over again. Get some b-roll footage for backup while the lights are on and you are in the moment.

7. Post - File Management
Once you feel like you've gotten all the footage you need the next step will be digitally organizing (likely a lot) of files. Depending on how many takes and cameras it took, this could be in the hundred of gigabytes. Having a dedicated external HD for video or media files is not a bad idea. You will need to keep everything in a place that doesn't move because your video editing software will be referencing each files path. If you move something, that path will break and your video won't load in your editing software.
This is the file structure I use for my projects. Feel free to copy or edit this to suit your needs:
- Name of Project
- Raw Footage
- Camera 1
- Take 1, Take 2, Take 3, etc...
- Camera 2
- Take 1, Take 2, Take 3, etc...
- Camera 3
- Take 1, Take 2, Take 3, etc...
- Export
- Video Project
- Audio Project
- Raw Audio
- Take 1
- Take 2
- Take 3 (etc.)
Notice that everything related to your project will live inside one folder so that should you need to move it, nothing will break.
It is also not a bad idea to backup to backup to another hard drive if possible at this moment. This files took a lot of work and accidents / failures can happen.
8. Post - Editing (Assembly)
You should have an idea around which takes worked and which didn't. Start editing by finding the best take by listening to the audio either alone or with the video. Stitching together different takes can get very complex with file management especially if the audio is separate from the video. Try sticking to one full take.
If you are editing your audio separately, it is a good idea to go ahead and do that before starting your video assembly to get it out of the way. It will also make it less confusing if you edit the timing of something and have to bring the audio back in, it might not line up.
Once you've found "the one", get all of your final material on your timeline. The rest of this process will be dependent on your software - I am using Adobe Premiere.
The first thing to do if your audio and video are separate files is to line them up. If you have a single camera with the audio and video together, you don't need to do this step. Anything other than that will require lining up.
Get your final audio take in place and start by finding the entrance of your audio's performance on your first camera. Manually nudge the video while looking at its audio component to match the your final audio file (if you recorded separate). Finding the first kick drum or "wall of sound" is a good point to line up with. If you recorded audio to your main camera and have additional multi-cameras, the process is the same except you are lining up your additional cameras to the main video's audio.
This is a very confusing concept to write about and is more easily summarized in these images:

In my example, I recorded my final audio to my main camera. I am syncing up the addition two cameras (yellow and pink) to match audio with my main (green).

One very important note is that you will never get things to line up exactly. Since you are using different devices with their own internal clocks that are not synchronized to each other, each is recording at its own speed. When you bring these files into your editing software you are working at a set frame rate. Things will be slightly out of sync and you will not be able to nudge the video past the resolution of the frame rate. Likely this difference will be imperceivable to the viewer, but you will notice it while editing. Unless your cameras and audio recording devices are synchronized to an external clock - you will have to live with this. The example video is not synchronized.
9. Post - Editing (Keying)
Almost to the fun part. Next step is to key out the green screen and open up your footage to more creative aspects. Depending on your software, find the video effect to select a color and remove it. Toy with the individual settings until you find the optimal amount of removal for your setup. Remember that this will be hugely dependent on your lighting and cameras. It might not be perfect so see what works best.

To test your settings as you go, place some background footage in another layer underneath your take. This will give you a better idea of how your keying is working instead of looking at the default black background. Use something bright so you can see all of your edges clearly.
If you have to make compromises, personally I prefer to remove all of the green and shadows (uneven green coverage) from the video and sacrifice some of the actual content. This way there isn't a lingering line or patch in the background that stays stationary for the entire video. You can see in the example video that some blacks in the equipment become transparent. This is because of the corner of the room created a dark shadow on the green screen, and I had to remove a wider selection of green than if it was 100% perfectly even and lit.
10. Post - Editing (Backgrounds)
This is the step where your video will start to feel like a finished project and really come together. If you haven't already, you will need to source footage to use for your backgrounds. This could literally be anything, so get creative! Here are some suggestions for things that you can use:
- If you're music has a specific genre, use visually similar material
- Busy vs. Simple - which one works better for you?
- Animate single or album artwork that you have, or use b-roll from your creation process
- Expand on the lore of your music and creative a visual narrative
- Create audio reactive backgrounds (visualizers / spectrograms / etc.)
- Comb through stock footage websites for inspiration
- Look at similar artists to you and see what they used, and see how you could make something unique to you
- What is your music about? Even without lyrics - think of the mood it invokes and create a word map.
- Abstractions. Sometimes things don't need to be so deep and can be simple moving colors. Let the music do the talking for itself approach.

Whatever you choose - there is a million ways to process the footage and blend it in with your performance. Experiment as much as possible until you reach a final look that you are happy with. See how blending multiple layers together looks vs using a single video layer. Do you want to change backgrounds for each song or have a continuous feel to the video? Options are truly endless and you will need to find what works for you.
Once you have your backgrounds in, you are free to edit the colors and grading of your footage to taste. Get it looking good and hit that export button!
Conclusion
As with anything, the more you do it the easier it will come. If this is a first time for you it will be overwhelming and seem like a mountain of work (I won't lie, it is). After doing it a few times your brain will naturally relax to the process and it will flow a lot easier.
Remember that it is about having fun and capturing the essence of your music. That can easily get lost in all the technical preparation and editing. Having a checklist for this process does make it easier since it is so much to keep track of everything that needs to be done.
I hope this tutorial helped you. If you'd like to stay updated when new ones come out - be sure to enter your email below to get a notification. Take care and keep making great tunes!